Insurance is a dedicated component in Storeganise separate from products or charges. Each site has coverage tiers, and each customer picks exactly one tier when they book. Use this article to set up tiers, require coverage at checkout, approve proof when customers bring their own insurance, change coverage on existing rentals, and report on insurance across a site.This feature stores insurance separately from other rental charges. This makes it possible to report on insurance sales, reprice existing customers, and share insurance data through the CSV export and the API.
How insurance works
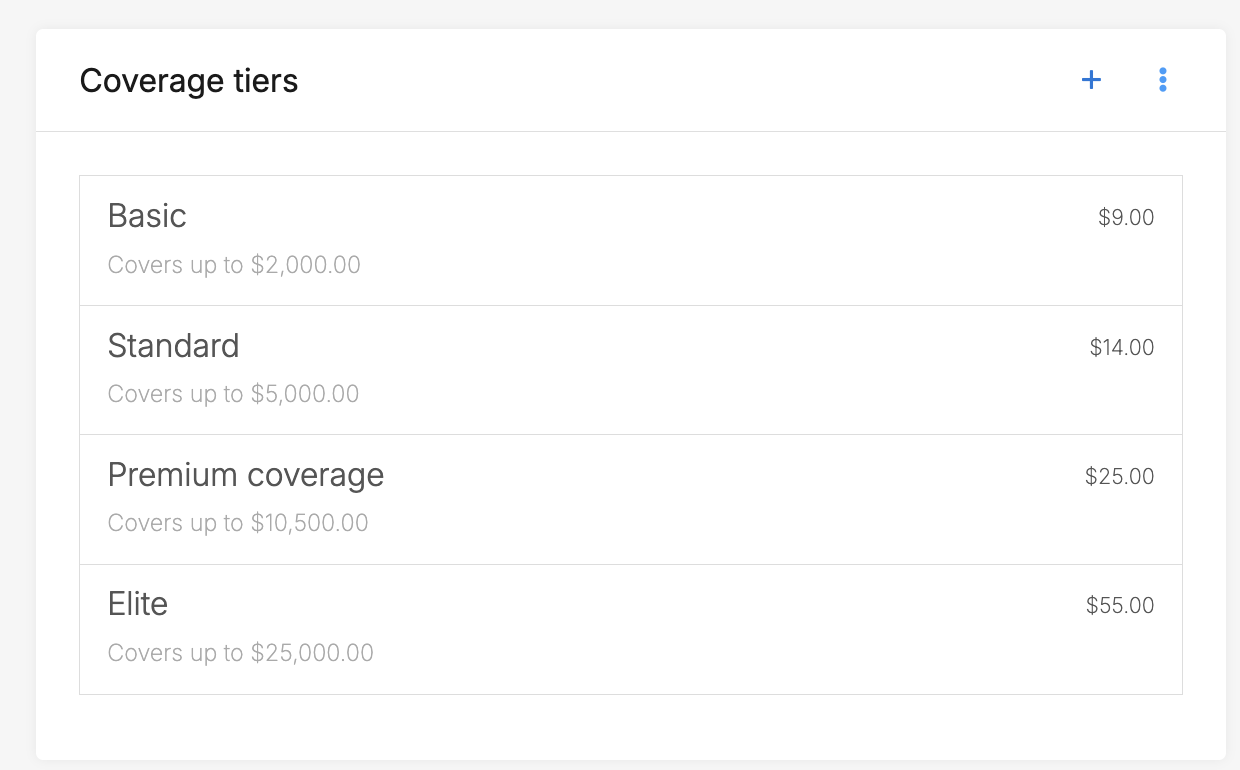
Insurance is set up per site. Each coverage tier has a name, a coverage amount, and a price. A customer picks exactly one tier when they book online through the Customer Portal.
Mandatory coverage: You can require customers to choose cover before they can book.
3rd party insurance: You can offer an I have my own insurance option. The customer uploads proof after booking, and staff approve or reject it from the move-in checklist.
Price at sign-up: Each rental keeps the price it signed up at. Changing a tier's price or deleting a tier only affects new customers.
Reporting: An Insurance card on the site overview, a CSV export, and the API all include insurance data.
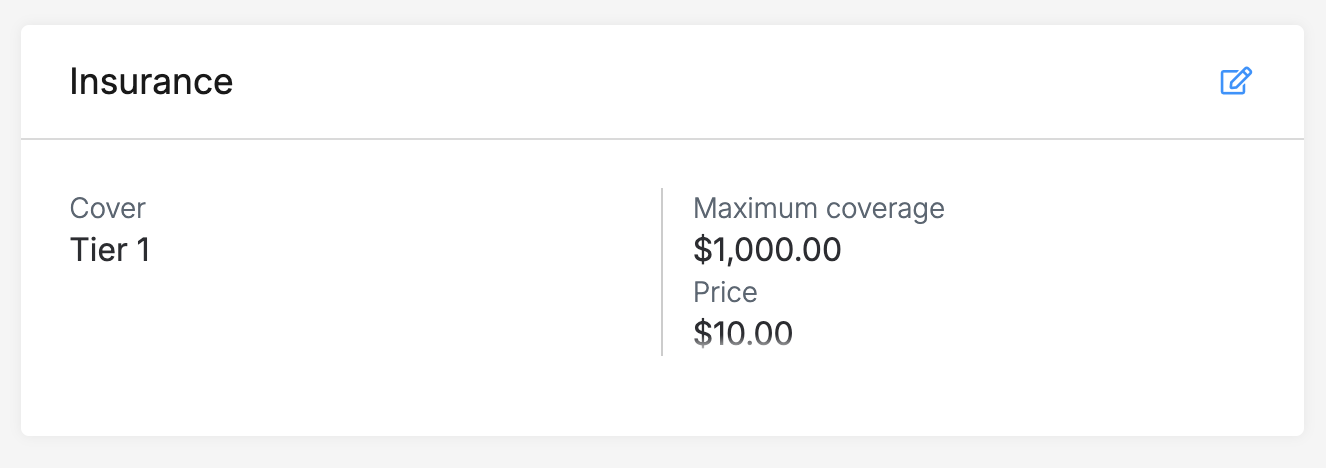
Insurance card found within a unit rental page
Setting up insurance
To setup and manage insurance at each site, go to Sites > [Site] > Insurance.
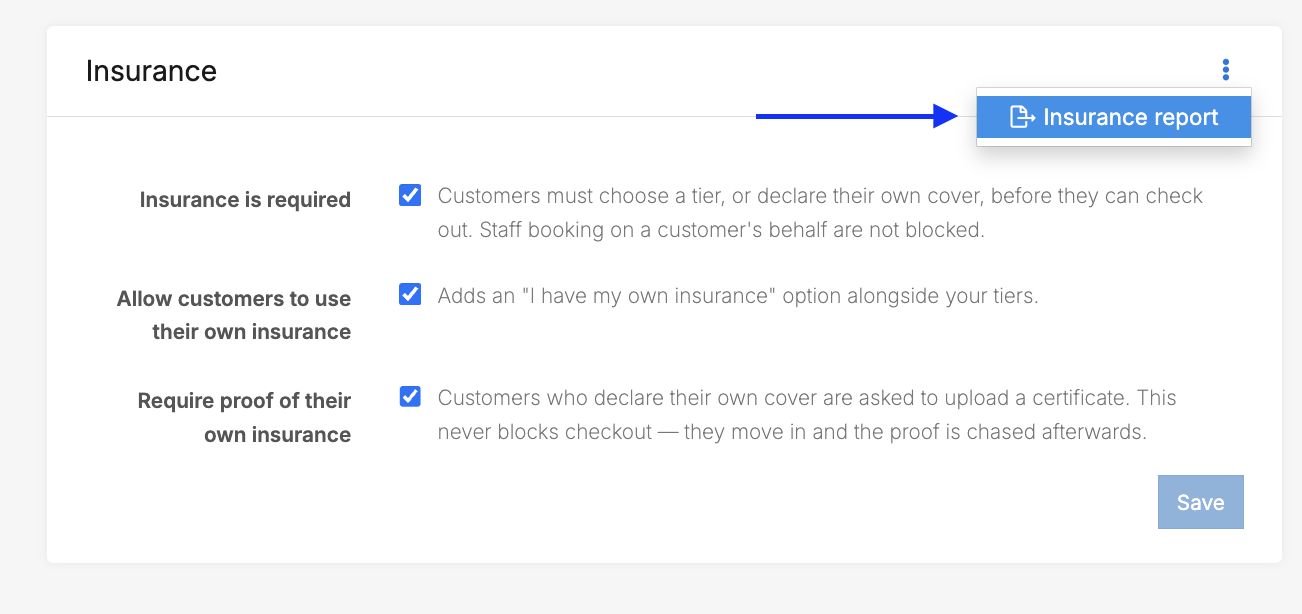
Select whether:
Insurance is required
You allow customers to bring their own insurance
If you require proof of 3rd party insurance coverage if they have their own
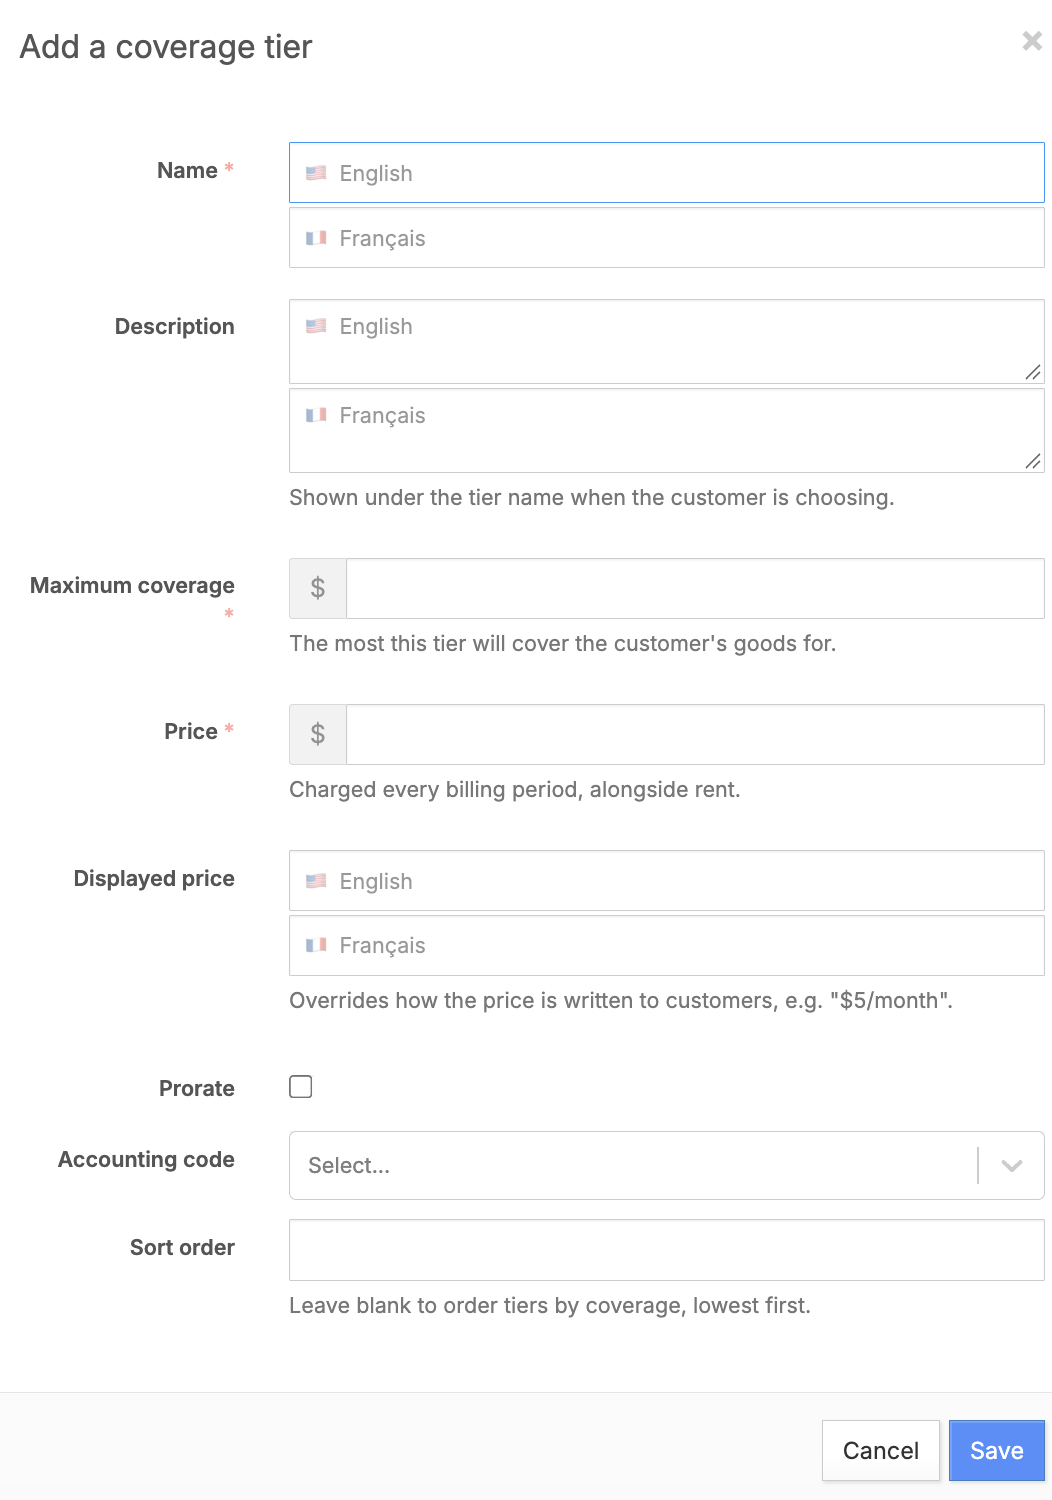
Then use the steps below to create each insurance tier you offer:
Click the + button to add a coverage tier
Enter the tier's name, for example Standard .
Add an optional longer description.
Enter the coverage amount.
Enter the price.
If you bill part periods, turn on the prorate option for the tier. See: How insurance is billed.
Set an accounting code to track the insurance charges and apply a corresponding tax rate
Repeat steps 2 to 7 for each tier you offer.
Customers see the tiers you add the next time they book at that site.
What customers see at checkout
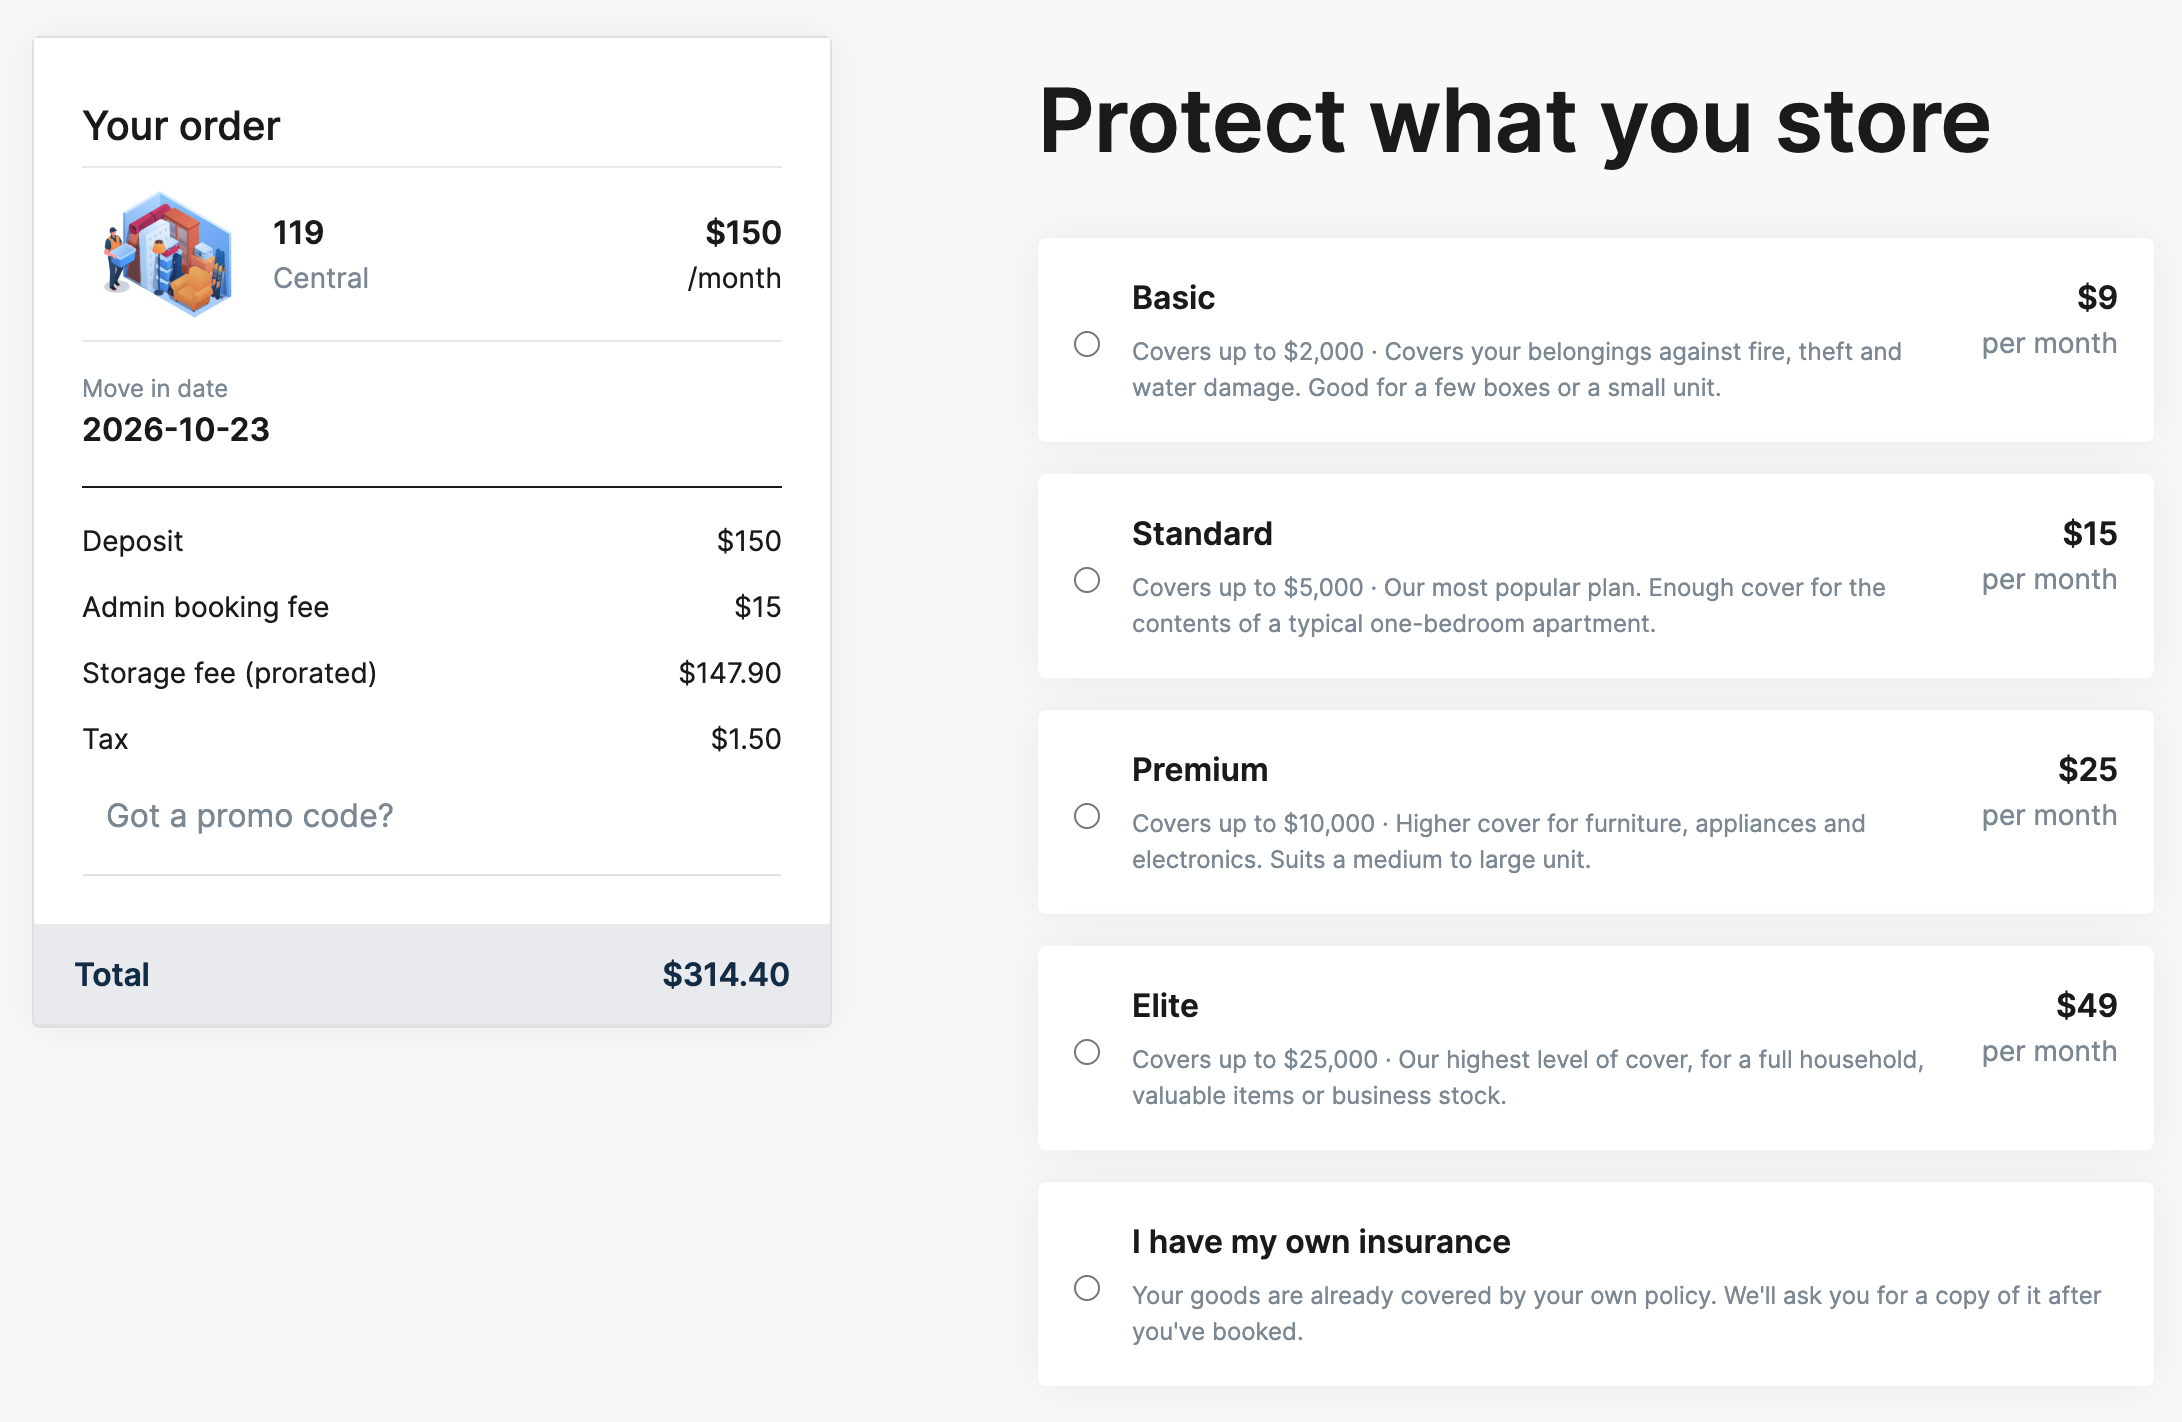
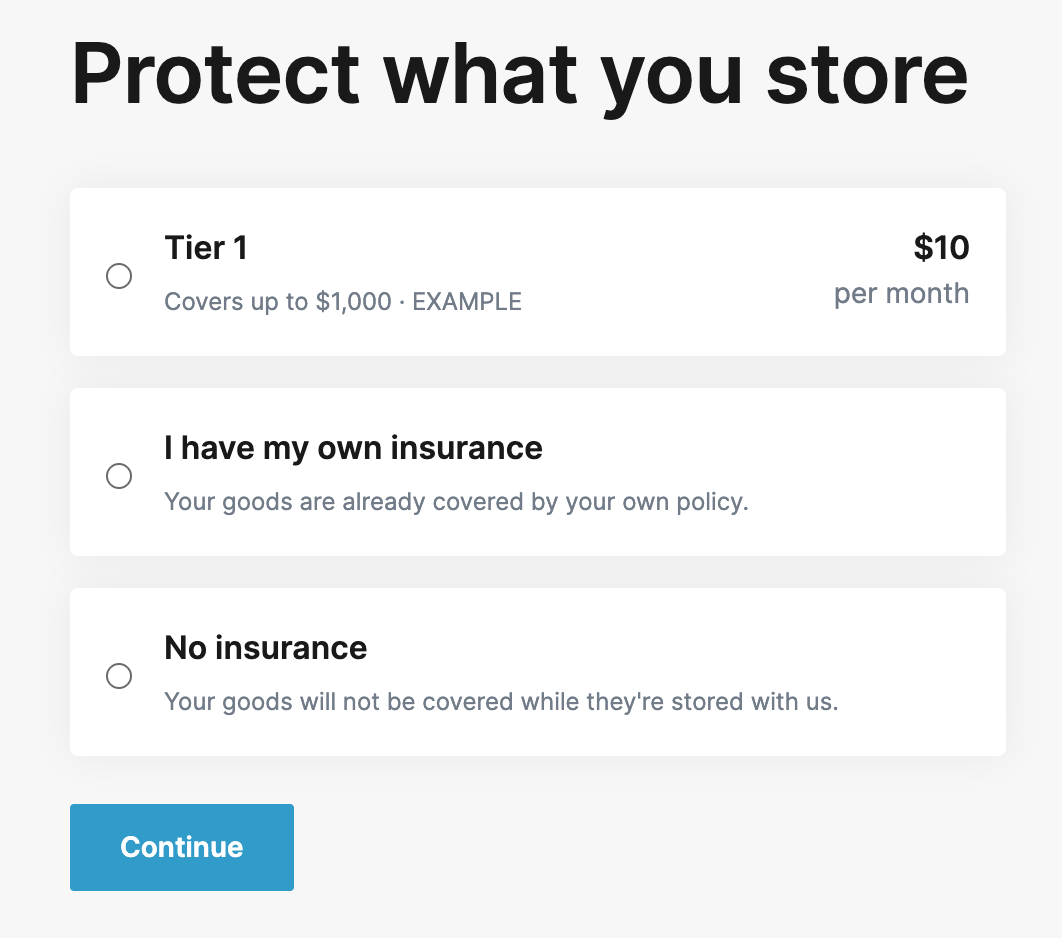
Customers choose their insurance tier in the booking flow in the Customer Portal. What they see depends on how you set up the site.
Insurance is required and customers can bring their own:
The customer must select a tier or choose I have my own insurance. If they choose their own insurance, they complete the booking first and upload proof afterward. The move-in stays on hold until staff review the proof. See: Review proof of the customer's own insurance.
Coverage is optional:
The customer still sees each tier with its name, coverage amount, and price. However, they have the option to continue without selecting any insurance.
Review proof of the customer's own insurance
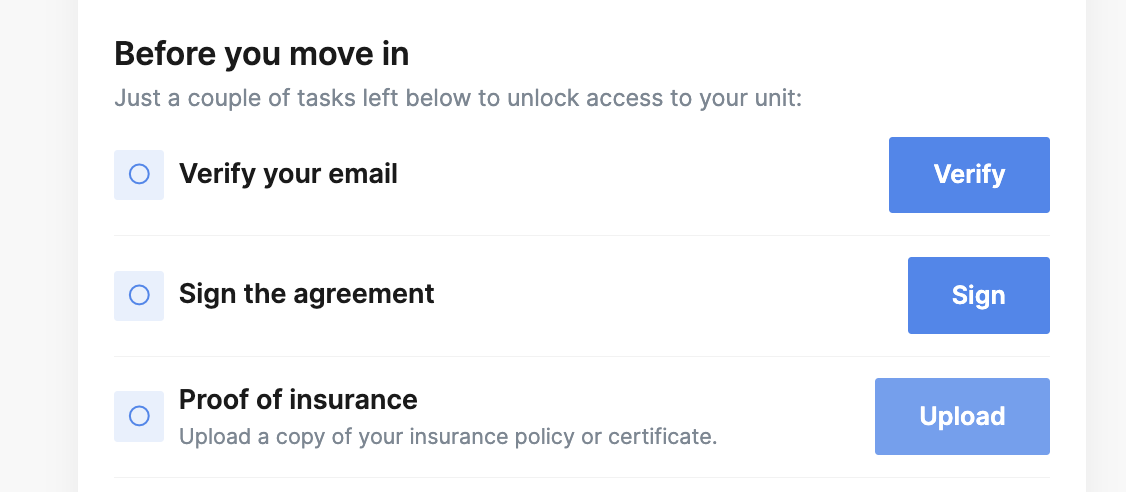
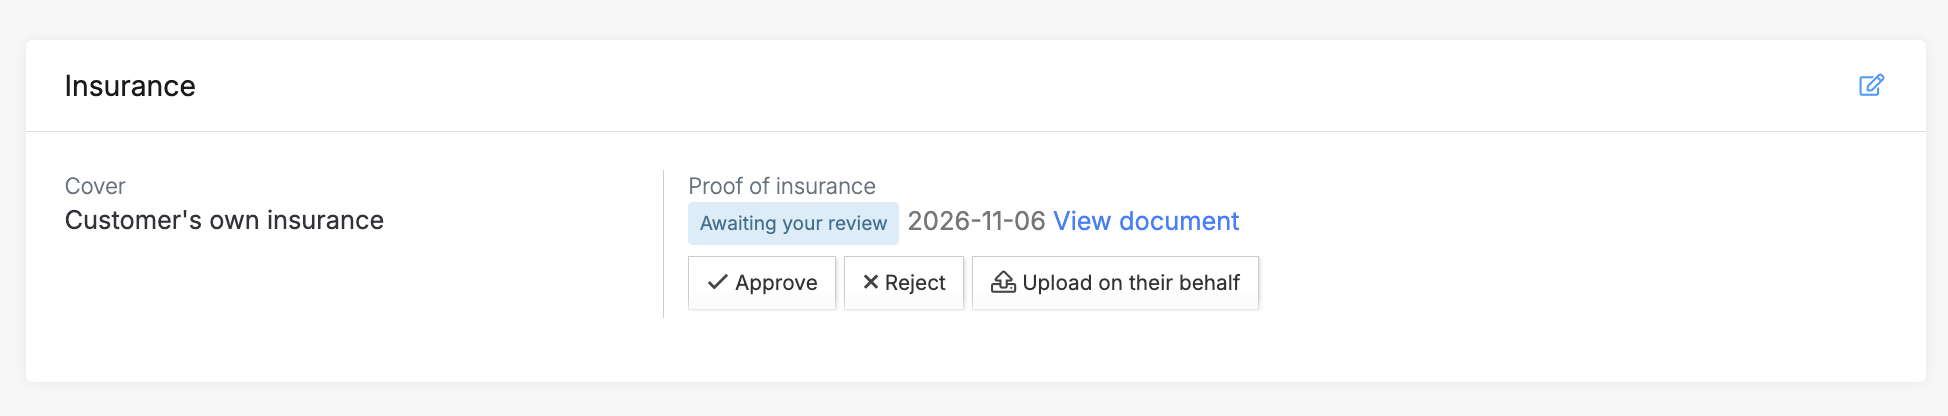
When a customer chooses I have my own insurance, the review appears as a task on the move-in checklist. The move-in stays in progress until staff approve the proof.
How it looks on the Customer Portal
Open the unit rental that is moving in.
Find the insurance task on the move-in checklist.
Open the proof the customer uploaded.
Click Approve if the proof is valid, or click Reject if it isn't.
If you reject the proof, the customer needs to provide a valid one before the move-in can continue.
Set or change a customer's insurance tier
Staff can set or change a customer's insurance tier in three places: during a move-in, on the rental page, or in bulk with a CSV update.
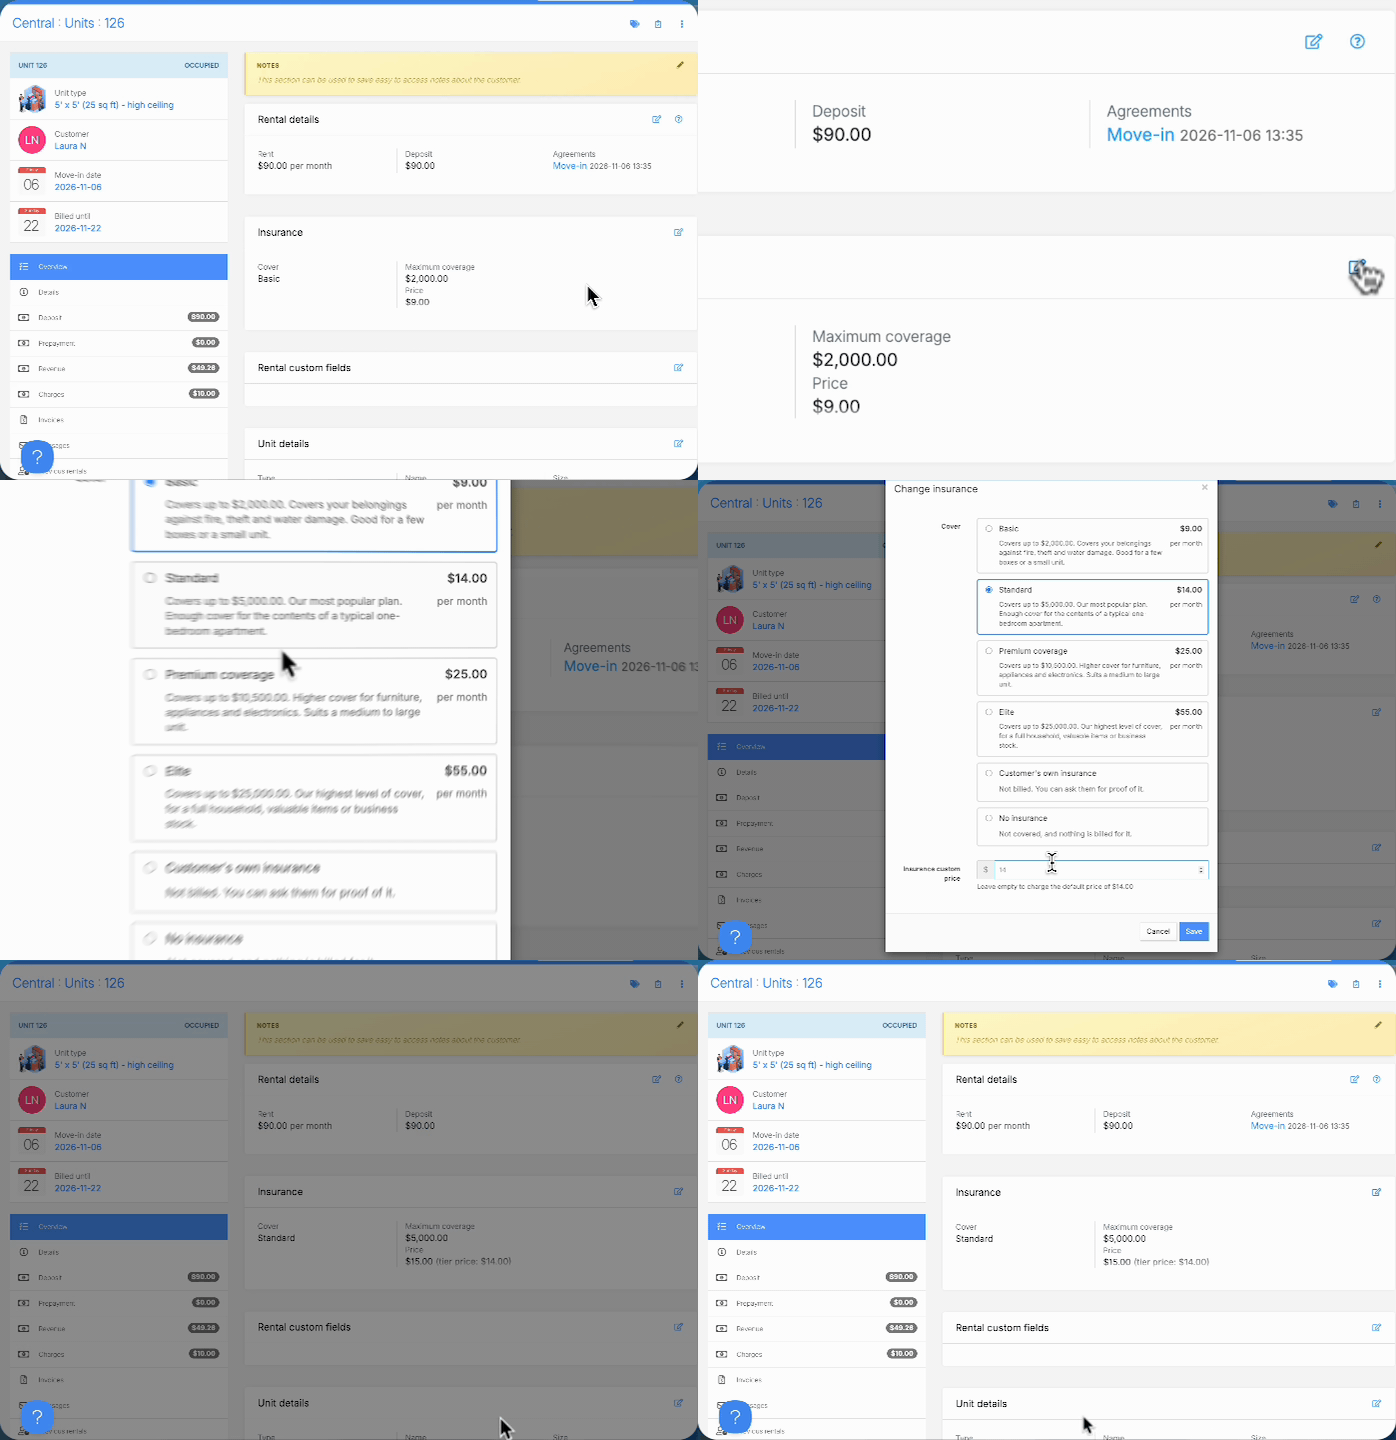
Change cover on the rental page
Open the unit rental.
Find the insurance section on the rental details page.
Click the edit button.
Select the tier you want, or select customer's own insurance.
Save your changes.
The rental details page shows the selected cover. Future invoices use the new tier's price.Managers can also give a single rental a custom insurance price, for example to apply a discount. The tier's own price stays the same for everyone else.To return the rental to the tier's price, clear the custom price and save.Note: Only managers can set a custom price.
To set cover during a move-in, use the insurance step on the move-in. To change many rentals at once, see: Update insurance in bulk with a CSV.
Change tier prices
Changing a tier's price only affects customers who book after the change. To change the tier price, simply go to your Site > Insurances section and click any you want to change to adjust and save. Existing rentals keep the price they signed up at. Deleting a tier also affects new customers only.To reprice existing customers:
Export the rentals on the tier, including the insurance columns.
Note: Storeganise doesn't email customers when their insurance price changes.
Update insurance in bulk with a CSV
Use a CSV update to change cover or price on many rentals at once. The process is the same as other bulk updates: export, edit, and upload. See Bulk updating data for the general steps.
Go to the Units list and open the three-dot menu.
Click Export, and include the rental ID and the insurance columns.
Download the CSV and edit the insurance columns in a spreadsheet.
Delete the rows you don't want to change.
Go back to the three-dot menu and choose the update option for unit rentals.
Select the edited CSV, and preview the update.
Confirm the update.
The update treats each row of the insurance columns as follows:
What you do in the CSV
What happens
Leave the row as exported
The rental doesn't change
Leave the price cell empty
The rental keeps its current price
Enter a new price in the price cell
The rental gets that price
Enter null in the price cell
The rental goes back to its tier's price
Change the tierId and leave the old price in place
The rental moves to the new tier at that tier's price
Set type to own
The rental switches to the customer's own insurance
Set type to null
The rental's insurance is removed
Enter a tier that doesn't exist
The whole row is refused and none of its columns are saved
If you set type to own on a site that doesn't accept customer's own insurance, the row is refused with an error. Rows for ended rentals go through without an error.
How insurance is billed
Insurance bills alongside rent, using the price on the rental. For a rental with a custom price, billing uses the custom price instead of the tier's price.
Date-of-month billing: If the customer moves in mid-period, the part period is prorated from the rental's insurance price, the same way rent is. A tier that doesn't have the prorate option on gets no part-period charge. The first full period bills at the full price.
Anniversary billing: There is no part period, so there is nothing to prorate. Each period bills at the full price, and prepaid periods include insurance next to rent.
Tax: Insurance follows the accounting code and corresponding tax rate set at the insurance tier in the site settings.
Report on insurance
Three places give you insurance data.
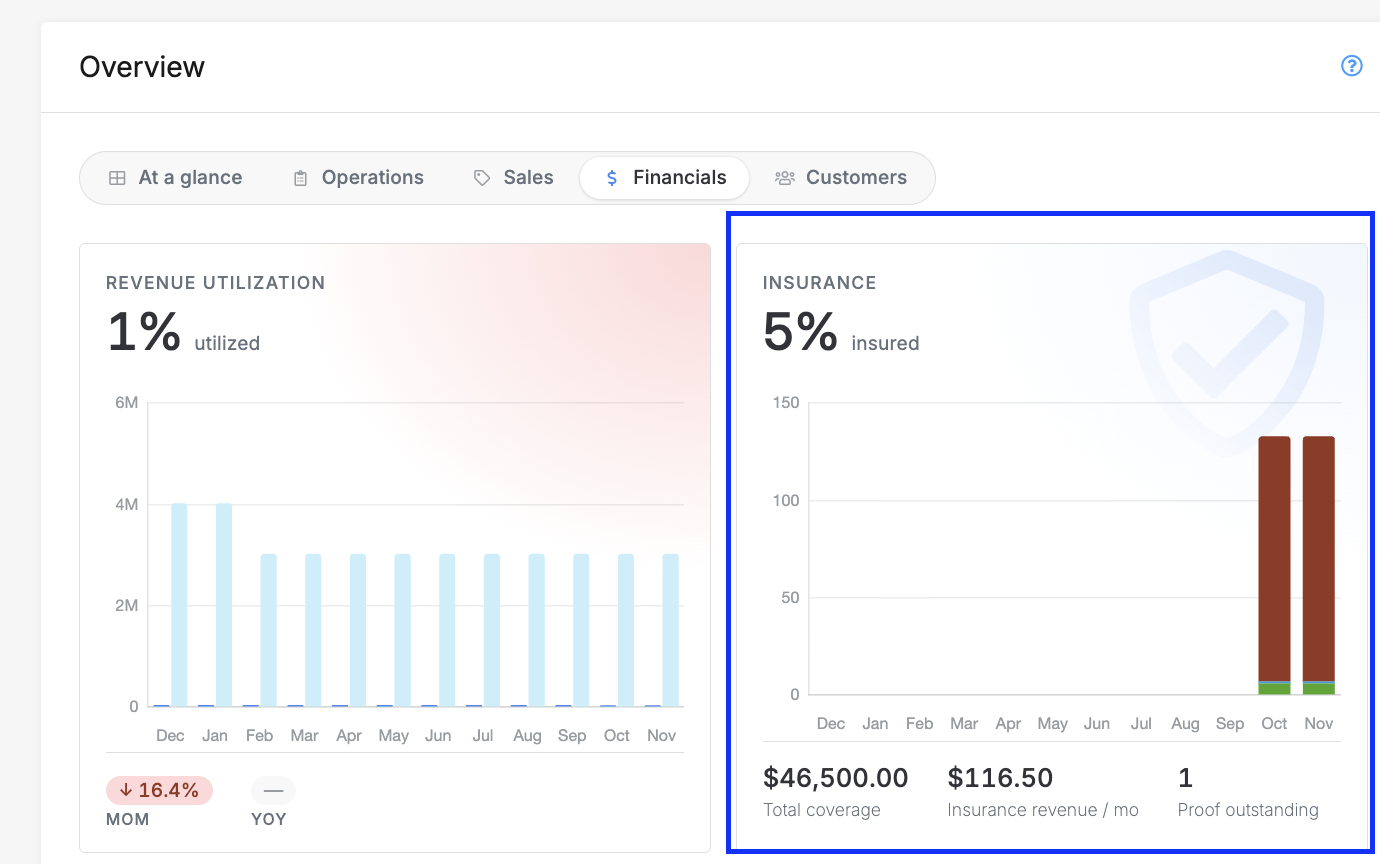
Site overview: An Insurance card on the site overview, in the Financials tab, shows cover over the last 12 months and the number of proofs still waiting for review.
Insurance report: A one-click report you can share with your insurer. To download it, go to Sites > [Site] > Insurance, open the three-dot menu in the first section, and click the insurance report option. The file is a CSV of rentals with the insurance fields included.
Rentals export and API: Insurance is also included in the unit rentals CSV export and the API. See Exporting data from Storeganise for the export steps.
Insurance sold as regular products
If you sell insurance as regular products, billing for those products continues as before. Storeganise doesn't move them to the insurance product type, so they don't appear in the Insurance card, the insurance report, or the insurance fields in the export.To use the new reporting, create coverage tiers for the site and set customers' cover to the matching tier. See Set up coverage tiers and Update insurance in bulk with a CSV.
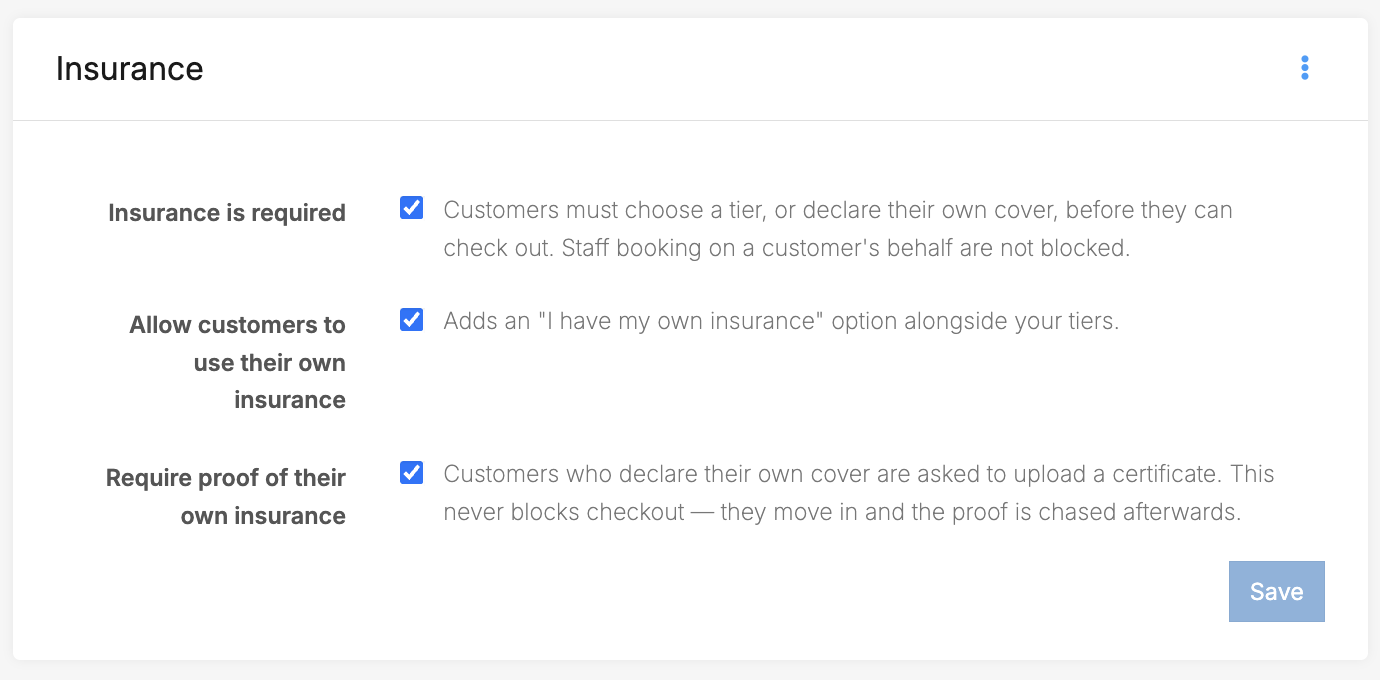 Select whether:
 If you reject the proof, the customer needs to provide a valid one before the move-in can continue.
 To set cover during a move-in, use the insurance step on the move-in. To change many rentals at once, see: Update insurance in bulk with a CSV.