Add-on: QuickBooks
In Beta. Contact support@storeganise.com to request access. This Add-on currently only supports self-storage operators using US QuickBooks accounts.
Important: Storeganise support cannot help with tax setup in QuickBooks. You're responsible for configuring tax codes correctly for your jurisdiction. Consult your accountant or tax advisor if you need assistance with tax configuration.
Setup
Follow these steps to set up the QuickBooks Add-on.Before you start
Make sure you have:- A QuickBooks Online account with administrator access
- The QuickBooks Add-on installed by the Storeganise team
Step 1: Connect to QuickBooks
- Go to Main Settings → Add-ons
- Find the QuickBooks Add-on and click Enable
- Click the Authorization link
- Log in to your QuickBooks Online account
- Select your company
- Click Authorize
- Return to Storeganise and verify the Company ID and App Token fields are filled.
Step 2: Set up sales tax in QuickBooks
- In QuickBooks, go to Taxes
- Follow the QuickBooks prompts to configure sales tax for your business location.
Step 3: Create products and services in QuickBooks
Create a Product/Service in QuickBooks for each revenue type you track (rent, deposit, prepayment, etc).- In QuickBooks, go to Sales → Products & Services
- Click New
- Fill in the fields:
- Name: Use a simple name like
Rent,Deposit, orPrepayment - Type: Service
- Description: Brief description like "Rental income"
- Income account: Select your revenue account
- Sales tax: Click Edit sales tax and choose either: Taxable — based on location only (for services like rent)Nontaxable (for services like deposits)
- Name: Use a simple name like
- Click Save
- Repeat for each revenue type
Step 4: Add accounting codes in Storeganise
Create an accounting code in Storeganise for each Product/Service, using the format[Product name]/TAX or [Product name]/NON 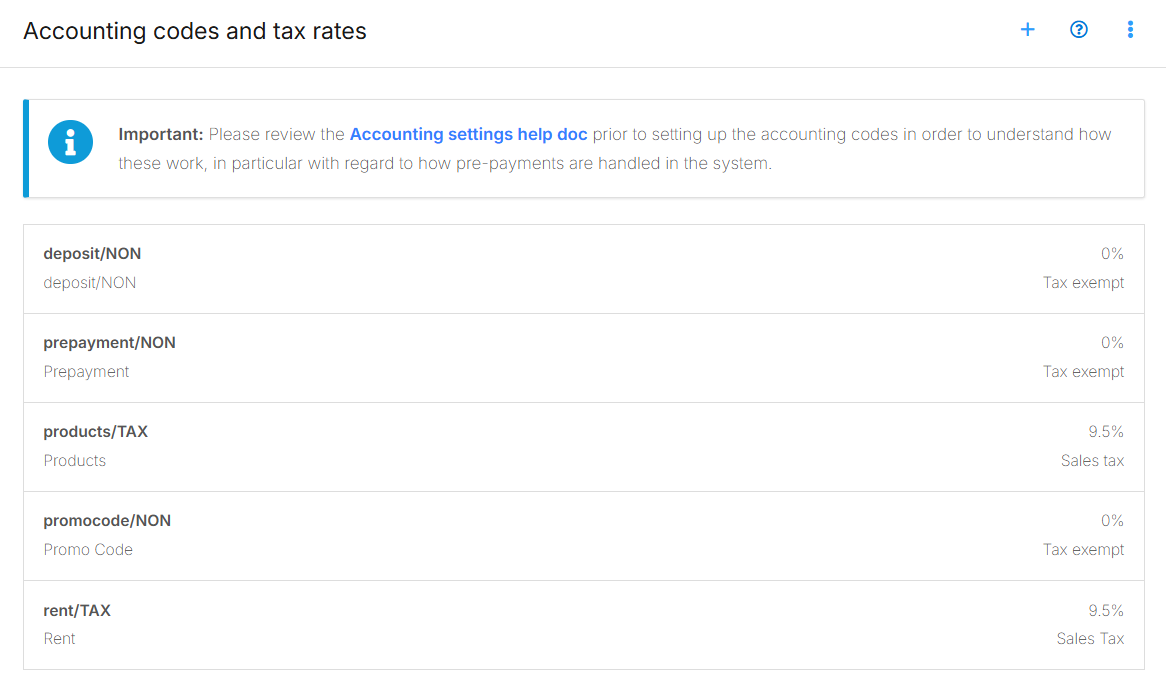
- Go to Main Settings → Accounting → Accounting codes and tax rates
- Click the + icon
- Enter the code:
- For taxable services:
[Product name]/TAX - For non-taxable services:
[Product name]/NON
- For taxable services:
- Repeat for each revenue type
Important: US QuickBooks accounts support only two tax options — Taxable and Nontaxable. The /TAX and /NON suffixes map directly to these. Do not attempt to create additional tax variations for US accounts.
| QuickBooks Product | QuickBooks Tax Setting | Storeganise Code |
|---|---|---|
Rent | Taxable | Rent/TAX |
Deposit | Nontaxable | Deposit/NON |
Prepayment | Taxable | Prepayment/TAX |
Critical: The product name (before the slash) must match your QuickBooks Product/Service name exactly. Names are case-sensitive: Rent ≠ rent
Step 5: Set up your bank accounts in QuickBooks
This step ensures payments recorded in Storeganise land in the right account in QuickBooks — not in "Undeposited Funds".The Add-on automatically routes payments to the correct QuickBooks bank account based on how the payment was recorded in Storeganise. For example, a cash payment goes to your "Cash" bank account, and a cheque payment goes to your "Cheque" bank account.How the matching works: The Add-on takes the name of each Bank-type account in your QuickBooks Chart of Accounts, converts it to lowercase, and then matches that against the payment method code in Storeganise.For example:- QuickBooks account named
Cash→ matches Storeganise methodcash - QuickBooks account named
Bank of America→ matches Storeganise methodbank_of_america
- In QuickBooks, go to Accounting → Chart of Accounts
- Make sure you have a Bank account for each payment method you use (e.g., Cash, Cheque)
- Make sure you have a Bank account set as your default — this is where card payments (Stripe, etc.) will be deposited. Note the exact name of this account.
If a payment method in Storeganise doesn't match any Bank account name in QuickBooks, it will automatically fall back to your default bank account (set in Step 6). This is expected behavior, not an error.

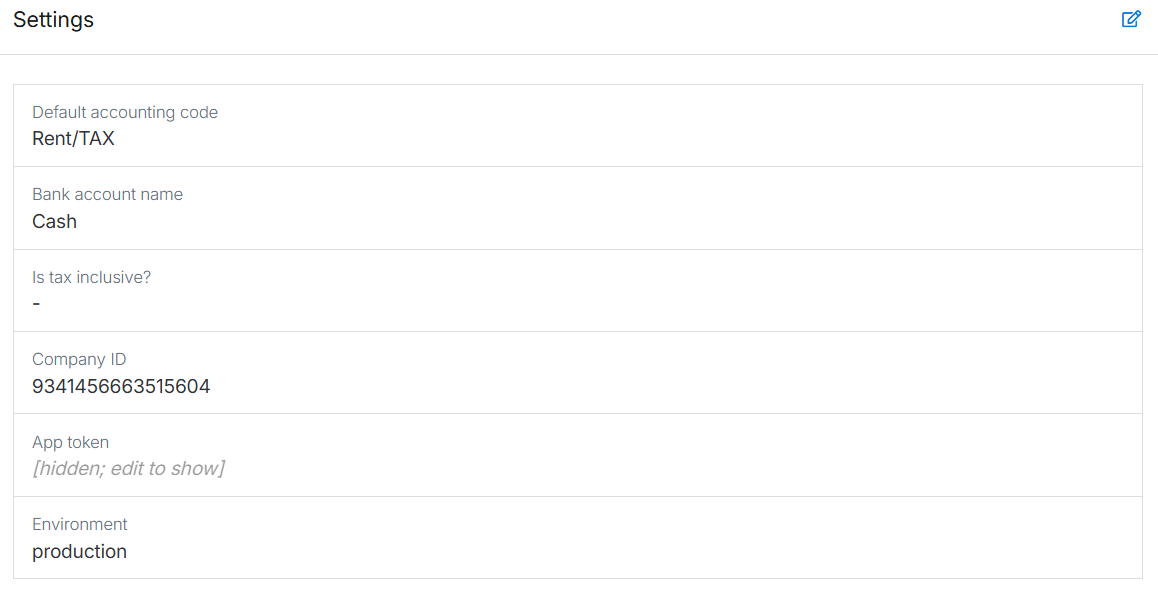
Step 6: Configure Add-on settings
- Go to Settings → Add-ons and open the QuickBooks Add-on
- Fill in these fields:
- Default accounting code: Example: Rent/TAX (used when an invoice line item has no specific code)
- Bank account name: The exact name of your default QuickBooks bank account (e.g., Business Checking). This must exist in your QuickBooks Chart of Accounts. All automated payments (e.g., Stripe) will go here, as will any manual payments that don't match a specific bank account.
- Skip zero amount invoices: QuickBooks doesn't accept $0 invoices. Enable this setting if any of your invoices might be reduced to $0 by an applied prepayment, otherwise those invoices will fail to sync and generate an error.
- Click Save
Step 7: Test the integration
- Go to Sites → Units
- Select a unit and click Schedule move-in
- Enter amounts for deposit and rent, then complete the move-in
- Send the invoice
- Check QuickBooks under Sales & Get Paid → Invoices to confirm the invoice synced with correct amounts and tax
- Process a test payment and verify it syncs to the correct bank account in QuickBooks
How the Add-on works
What syncs automatically
Invoices: Sent and paid invoices sync to QuickBooks as invoices. Invoices reduced to $0 by an applied prepayment can be excluded from sync using the Skip zero amount invoices setting (see Skip zero amount invoices below). Draft invoices and invoices created before enabling the Add-on do NOT sync.Invoice updates: If you return a sent invoice to draft in Storeganise, you can add or remove line items and resend it. The corresponding QuickBooks invoice will be updated automatically — new line items are added and removed line items are deleted. The invoice total in QuickBooks will reflect the updated amounts.Credit notes: Sync to QuickBooks as credit memos. When a credit note is linked to an invoice in Storeganise, the add-on automatically applies it to the correct invoice in QuickBooks — you don't need to do this manually. The invoice balance and credit memo are updated together.Payments: Both Stripe and manual payments sync automatically and are matched to the correct invoice. Manual payments are routed to the correct bank account based on the payment method — for example, a cash payment goes to your "Cash" account in QuickBooks.Refunds: Must be processed as credit notes. Do NOT use negative line items on invoices.Skip zero amount invoices
QuickBooks doesn't accept $0 invoices. If a prepayment applied to a rental invoice reduces the total to $0, enable the Skip zero amount invoices setting in the Add-on settings so it's excluded from syncing to QuickBooks. If this setting is disabled, every $0 invoice generated in Storeganise will fail to sync and generate an error.Sync timing
Most invoices sync within 1 minute. Brief delays may occur during high-volume periods.Currency
Your Storeganise site currency should match your QuickBooks home currency. Currency mismatches may cause sync failures.Payment routing
When a payment is recorded in Storeganise, the add-on determines which QuickBooks bank account to deposit it into:- Manual payments (cash, cheque, bank transfer, etc.) — the add-on matches the Storeganise payment method code to a QuickBooks Bank account using normalized name matching. If no match is found, it falls back to your default bank account.
- Automated payments (Stripe, GoCardless, etc.) — always go to your default bank account (
Bank account namein Add-on settings).
Credit note to invoice linking
When a credit note is linked to an invoice in Storeganise, both sync to QuickBooks and are automatically linked. The credit memo is applied to the invoice in QuickBooks, reducing the invoice balance and the credit memo's remaining credit to zero. You don't need to apply credit memos manually from the QuickBooks UI.QuickBooks invoice number
When an invoice syncs to QuickBooks, Storeganise automatically stores the QuickBooks invoice number in a custom field on the Storeganise invoice.This field is separate from the QuickBooks ID field. Here's the difference:| Field | What it shows | Example |
|---|---|---|
| QuickBooks ID | QuickBooks' internal API identifier | invoice/8 |
| QuickBooks invoice # | The invoice number as displayed in QuickBooks | 1001 |
QuickBooks ID field
This is different from the QuickBooks invoice # field — see QuickBooks invoice number for details on how to use that field to cross-reference invoices.When an invoice syncs from Storeganise to QuickBooks, a QuickBooks ID is stored in a custom field on the Storeganise invoice.What the QuickBooks ID represents: The ID stored in Storeganise (e.g.,invoice/8 ) is QuickBooks' internal API identifier, not the invoice display number you see in QuickBooks. The display number in QuickBooks may be different (e.g., "1001"), but both reference the same invoice.Viewing invoices in QuickBooks: To view the synced invoice directly in QuickBooks, open the invoice in Storeganise, find the QuickBooks ID custom field, and click the blue link below the ID.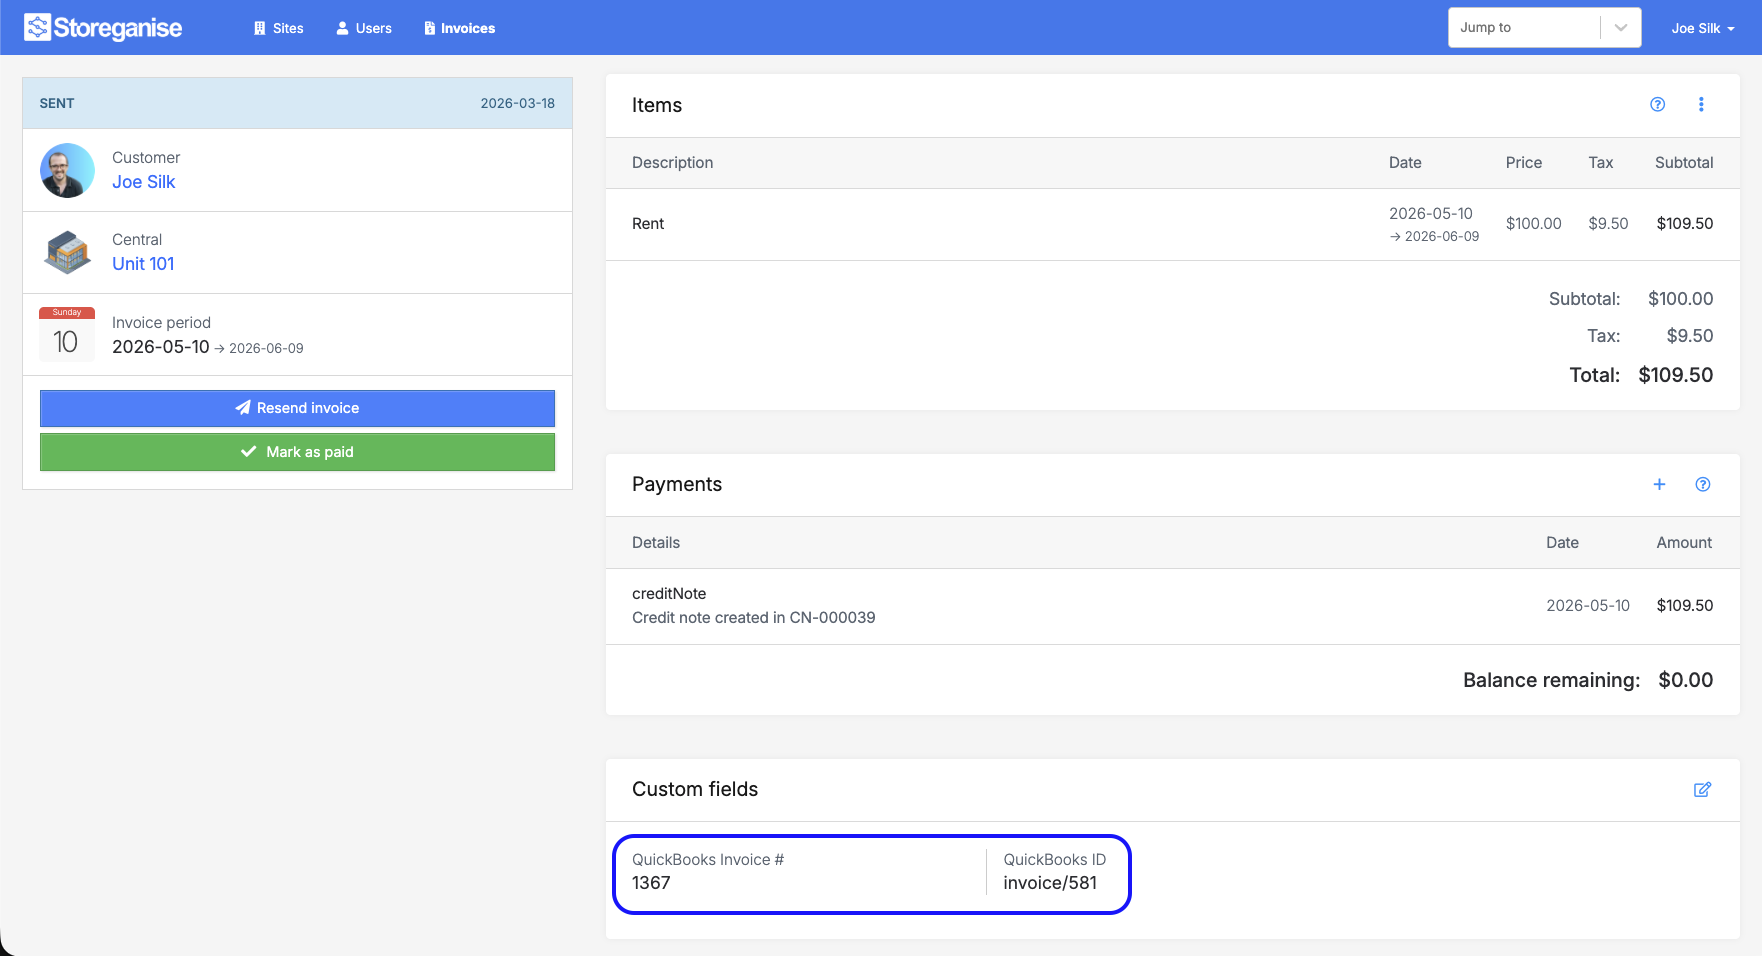
Maintaining your connection
QuickBooks requires re-authorization approximately every 90 days.When to re-authorize
Re-authorize if you see authentication errors, an "Authorization expired" message, or if invoices stop syncing.How to re-authorize
- Go to Main Settings → Add-ons
- Open the QuickBooks Add-on
- Click Authorization
- Log in to QuickBooks and select your company
- Click Authorize
Processing refunds
To process a refund that syncs correctly to QuickBooks:- Go to the customer's account in Storeganise
- Create a new credit note for the refund amount
- Send the credit note
Important: Do NOT add negative line items to invoices. This causes a sync error.
Request failed with status code 400
This error appears if a negative value is added anywhere on an invoice. If you're seeing it on prepayment-applied invoices, enable Skip zero amount invoices in the Add-on settings to exclude them from syncing entirely.
Solution: Remove any manually added negative line items and use a credit note instead.
Troubleshooting
Setup errors (most common issues)
| Error | Solution |
|---|---|
QuickBooks Product named Rent/TAX | Remove the /TAX suffix — use Rent only |
Storeganise code is Rent (missing suffix) | Add the suffix — use Rent/TAX or Rent/NON |
Case mismatch: QB = Rent , SG = rent/TAX | Make the product name match exactly: Rent/TAX |
| Problem | Solution |
|---|---|
| Payments going to "Undeposited Funds" | Ensure Bank accounts exist in QuickBooks Chart of Accounts with names that match your Storeganise payment method codes (lowercased, spaces as underscores) |
| Manual payment going to wrong account | Check that your QuickBooks Bank account name normalizes to match the Storeganise payment method code. Example: QB "Cash" → cash |
| Default bank account not found error | Verify the Bank account name in Add-on settings exactly matches an existing QuickBooks account name |
Sync issues
Invoices not syncing:- Only sent (non-draft) invoices sync
- Only invoices created after enabling the Add-on sync
- Old invoices will NOT sync
Setup checklist
US accounts
- ✅ Products/Services in QuickBooks use simple names (e.g.,
Rent,Deposit) - ✅ Each Product/Service is marked as Taxable or Nontaxable
- ✅ Storeganise codes use format
[Product name]/TAXor[Product name]/NON - ✅ Product names match exactly between systems (case-sensitive)
- ✅ Bank accounts exist in QuickBooks for each manual payment method you use
- ✅ Bank account name in Add-on settings exists in QuickBooks Chart of Accounts
- ✅ Test invoice synced successfully
- ✅ Test payment routed to the correct bank account